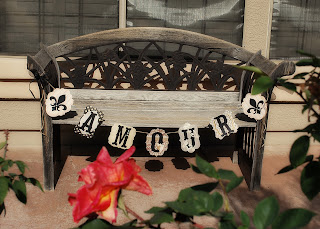
I had been itching do some sort of project the only problem is that I've been traveling so much I don't always have my "regular" tools and supplies with me at all times. Lucky for me I have a mother-in-law who doesn't mind being my partner in crime.
I had been perusing the Pinterest boards looking at Valentine's Day craft projects not knowing what I should do. I don't typically get all gung-ho when it comes to some of the smaller holidays and after Christmas don't really want to re-decorate my house again. I also don't really want to put a bunch of colors up that don't already go with my everyday decor. That's when my light bulb went off. I could make a holiday banner.
My house has touches of shabby chic in it and a lot of black and white, silver, gold, etc. I had an idea in my head of what I kind of wanted the holiday banner to look like. I opted for the word "Amour" to "Love" as I not only have another craft in mind for that word but also wanted something a little longer. Thus, off to Hobby Lobby we went in search of various papers. Little did we know that was the easy part.
Next we logged in Silhouette's library and found various tag templates for all of the backgrounds. The hardest part was deciding how to accent each letter and background. I'm not kidding when I say I spent a few hours on this part. The Silhouette did all of the cutting for me so after my design was complete I just had to assemble it together.
I couldn't be happier with the outcome. I can easily hang this up in my house without doing any sort of re-arranging of my current decor and it not only acts as a Valentine's Day banner but it could also double as an Anniversary banner.
Here are the specifics for each letter:
A - Black and White Cream Polka Dot Paper Background; Grey Paper with Music for the Shield
M- Tan Paper with Words All Over for Background; Pearl Embellishments on top of the Letter
0 - Red Damask Paper Background; Cardboard and White Pearl Specialty Papers for Rectangles behind the Letter; Hearts Punched out of Various Papers
U - Grey and Cream Small Polka Dot Paper for Background; 2 Flourishes out of Cream Cardstock; White Pearl Specialty Paper for the Bird
R - White and Gold Patterned Specialty Paper for Background; Gold, Word, and Grey Cardstock for the Brackets
Then of course there is the Fleur De Lis which is on a pink striped paper. It has just a touch of glitter which I love.
I used the antique ink on a few of the papers to help add a little variety as well.
Overall it really is a simple project, one worth attempting.


You are so clever! Beautiful job, Sarah. :)
ReplyDeleteI love it - very classy
ReplyDeleteVery cute! I love it. Thanks for sharing it with us on the Valentine craft Linky!
ReplyDelete